1. Introduction
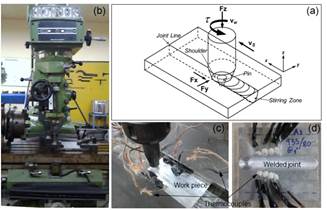
Friction stir welding (FSW) is a solid-state welding process able to join miscellaneous kind of materials [1]. This process has become very interesting for industrial applications due to versatility of joining ferrous and nonferrous metals, polymers and composites, including dissimilar joints, especially for low weldability materials [2]. Almost all kind of Aluminum alloys for automotive, shipbuilding and aerospace applications are being successfully joined using FSW, markedly those classified as non- weldable types due to poor solidification and hot cracking problems during fusion welding [3]. FSW is performed by using a non-consumable rotating tool, which is made up of a body, a shoulder and a pin. During the process, both the shoulder and the pin of tool, are inserted orthogonally into the interface of workpiece until the shoulder face is contacted with the workpiece surface, using a constant axial force. The advance of the tool along the joint line is provided with the aim to allow solid-state bonding the pieces, as shown in Fig. 1 [4].

Source: The authors.
Figure 1 Experimental setup used. (a) Sketch of parameters and parts of friction-stir welded joint. (b) Set up and mill machine used. (c) Experimental setup for thermal cycle measurements. (d) Thermocouples disposition on welded plate.
The most important processing parameters in FSW are: Axial or downward force (Fz), Force in the opposite of travel direction (Fx), Force perpendicular to travel direction (Fy), travel speed (vs), spindle torque (τ), and rotation speed (ω). Processing parameters dominate the quality, mechanical properties, energy consumption, and performance of welded joints [5-6]. Tool geometry configuration plays an important role in control of processing parameters, extension and mechanical properties in the welding regions, however, it is not possible to establish a direct and simple relationship [7]. Processing parameters are selected to allow adequate energy input and kinematical conditions aiming to defect-less welded joints [8].
Among others, typical geometries of FSW tools with several pin designs have been studied, including cylindrical, conical, and trapezoidal. Several works show strong dependency of initial state of aluminum alloy and processing parameters on increasing or decreasing of tensile strength, hardness and weld regions extension. Overall, for aluminum alloys, tools with cylindrical pin produced welded joints with higher tensile strength and larger welding regions than conical and trapezoidal formats [9-12]. Aforementioned results are more pronounced when the parameters of rotation and travel speed are increased [8-10]. Several studies have established that the machine type where are developed the welding joints play an important role in the presence of internal defects and variations of mechanical properties [13-16].
Features in tool shoulder (such as scrolls, spirals, and concentric circles, among others) have a strong incidence in both, frictional and plasticity heat, during friction stir welding [17-18]. Even though, it has been developed extensively works about effects of tool geometry in friction stir welded joints, most of these works are focused in pin geometry, while studies related to shoulder geometry are rarely found. The aim of this work is to establish the effects of shoulder geometry on the microstructure evolution and mechanical properties of commercially pure aluminum welded joints obtained by FSW produced in a milling machine. This study is supported on the microstructure characterization and measurements of mechanical properties of welded joints obtained for three different pin tool designs.
2. Experimental procedures
2.1. Materials
Plates of AA1100 aluminum alloy of 6 mm thickness in strain-hardened condition were used as base material. Chemical composition and mechanical properties of base metal are shown in Table 1. The welding was carried out perpendicular to the rolling direction of the plates. Rolled orientation was carefully traced with the aim to hold it perpendicularly to welding direction.
2.2. Tool design
Dimensional and geometrical characteristics of FSW tools used in this work are shown in Fig. 2. A set of three tools with identical shoulder diameter and body shape but with different shoulder geometry were fabricated using steel AISI H13, whose chemical composition is shown in Table 2.
The shoulder features were chosen to increase surface, to alter the material flow in the stir zone, and to decrease axial force during the process. The tools were heat treated to reach a minimum of 500 HV (Vickers hardness). Thermal treatments were carried out by taking precautions to prevent dimensional alterations and surface micro-cracks.
2.3. Welding parameters and experimental setup
A vertical milling machine with 3.5 HP was used to carry out the welding joints. Selection of welding parameters aiming to obtain samples for evaluation was divided in two tasks. The first one was to determine the process windows, in which values of rotation speed from 600 to 1200 rpm, and travel speed from 60 to 120 mm?min-1, respectively, were used. Experiments using combinations of the above-mentioned parameters to obtain values of revolutionary pitch (R) (mm?rev-1) from 0.1 to 0.3 aiming to maximize tensile strength of welded joints were developed [16]. Visual inspection was used to guarantee that welded joints defect-free were obtained. Then, the best parameters were chosen to use in the second set of tests. Second set of samples was destructively tested with the aim to obtain a defect-free transverse sections. Cut plates of 100 ? 50 ? 6 mm3 were used during the first and second sets. A last set of samples was carried out on plates with 330 ? 240 ? 6 mm3 of dimensions, replicating successful parameters of the second set. On the last set were developed thermal cycle measurements and were extracted samples for mechanical properties tests and metallography, such as shown on Fig. 3.
2.4. Thermal cycle measurements
Thermal cycles were measured using k-type thermocouples and a real time coupled acquisition system NI cDAQ-9188 and a NI TB-9214 transducer modulus. Thermocouples were fixed using ceramic cement and isolated wire. Distribution of thermocouples along welding regions was based on size of the welding regions. Thermal cycles in stir zone were not measured. Four thermocouples were localized on each side of the weld joint with same distance away from the joint line, as shown on Fig. 1d. Thermocouples were localized at 11mm, 13mm, 17mm, and 50mm from center line of each welded joint.
2.5. Microstructure evolution and crystallography analysis
Metallographic samples were extracted from stable region of welded joint (regions marked with M on Fig. 3). Standard metallographic preparation was developed using emery paper and alumina 5 μm. Etching of samples was carried out using HF 0.5 % v/v during 30 s. Two optical microscopes, Olympus® SZ6 and Olympus® BX51M, were used to perform metallographic analysis on welded regions produced by the process. A Quanta® FEI 650 microscope was used for crystallographic analyses. The crystallographic analyses were made using electron backscattering diffraction electron (EBSD), detector Nordlys-F, AZTec HKL fast acquisition, 20 kV electron beam energy, 0.5 μm of step, and Channel 5 HKL processing software. EBSD measurements allowed determination of grain size and orientation image maps (OIM) on welded regions.
2.6. Mechanical properties tests
Samples for transverse tensile strength measurements, transverse guided bend, and hardness tests were extracted in accordance to standards AWS B4.0, ASTM E 190-92 and ASTM B557-10, respectively. A Shimadzu AGX machine of 100 kN was used for the tension tests. Transverse hardness distribution measurements were performed in a testing machine Zwick / Rowell® type 8187.5 LKV. Three scan lines of hardness were carried out taking indentations on the cross section of welded samples in positions lower, middle, and upper, which are referred to as portions with similar location in base metal. The indentations were separated by 2 mm between them using 3000 gf and 10 s of dwell time. Guided bend test was carried out using a tensile strength machine Shimadzu® UH of 600 kN maximum load and using standard ASTM E 190-92.
3. Results and discussion
3.1. Welding parameters selection
In Fig. 4 are shown the results of welded joints set for preliminary parameters selection. It is observed that pitch (R) values were purposely kept between 0.1 and 0.3 using values of ω and vs between 800 to 1200 rpm, and 80 to 120 mm.min-1, respectively. Welded joints obtained using this set of parameters provided samples with good and acceptable external appearance. Better welded joints were obtained when values of ω and vs were 1000 rpm, and 100 mm.min-1, respectively. Welded joints with R-values lower than 0.1 presented notorious ripples and a few burrs, exhibited welding defects, such as internal voids and incomplete filling along transverse weld sections, which may be caused by insufficient warmth [18].
Higher R-values have provided welded joints with clear ripples, but excessive burrs attributable to excessive heat. In accordance to the above results, there were R-values near to 0.1 selected for use in the evaluation of the final set of parameters. Appearance of surface and observations on quality of welded joints obtained by using selected set of parameters are shown in Fig. 5. All welded joints obtained were free of internal defects, voids and presented clear ripples. Set of evaluated samples shows that if surface of shoulder area is increased, then there is a high tendency to produce burrs and serrated edge on the retreating side; these results show a relation between surface area and heat generation.
3.2. Welding regions and microstructure evolution
AA1100 aluminum alloys do not contain second phases, hence during welding processes is not expected any phase transformations related to second phases. Therefore, it is expected that FSW process will affect only the orientation and size of the grain.
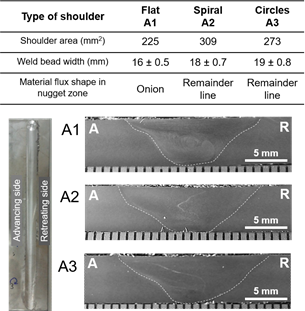
The effect of the tool shoulder on the width of the weld bead is shown in Fig. 6. It is observed that an increase in the surface shoulder area causes an enlargement of the weld bead. A reasonable explanation for this behavior is based on fact that increments in the surface shoulder area cause an increase of the frictional heat [4]. Since the diameter of the shoulder remains fixed, plasticizer heat available on the stir zone is increased too.
Then, the majority of the heat generation occurs at shoulder/piece interface, where the intensity of effects depends on contact conditions between the two surfaces [17]. The considerations above mentioned suggest that shoulder geometry with spirals may induce most severe conditions of contact and confinement of plasticized materials capacity, being prone to exacerbated flash formation on welded joints due to bigger surface area (Fig. 5).
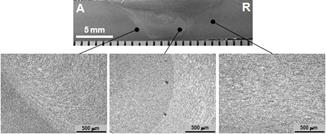
On the other hand, featured shoulders influence the material flow pattern in the stir zone. An onion like-shape of the stir zone was observed with the flat shoulder; meanwhile, the concentric and the spiral shoulder produced an elliptical region with a joint line remnant [4]. The former material flow pattern is an indication of higher heat input caused by these shoulder geometries [18]. The stir zone underwent the most important microstructural changes during the process, as shown on Fig. 7.
Evidences of changes that occur in the weld nugget due to thermomechanical processes typically evidenced in FSW, such as, change of size and grain structure, were observed. Orientation map images (OIM) using electron backscattering diffraction technique, were obtained from a little portion of 250 μm ? 250 μm of nugget center of each sample, which are shown on Fig. 8.
OIM analysis showed an increase of average grain size on stir zone, which was proportional to the increase of shoulder area surface. Tools with flat shoulder produced smaller average of grain size (7.8 μm), meanwhile, tools with spiraled shoulder produced bigger average grain size (44.2

Source: The authors.
Figure 6 Macrographs show cross section of welded samples. A: Advanced side. R: Retreated side.

Source: The authors.
Figure 7 Micrographs of several regions of cross section of A1 welded sample. A: Advanced side. R: Retreated side.
μm) in stir zone. A reasonable explanation for the above discussed is that, when contact area between tool and workpiece is increased, then the available plasticizer heat is increased for each case. This fact is consistent with grain growth observed in stir zone for condition A3, which is fully associated to peak temperature at this zone, and in turn, it controls static recrystallization process [19]. However, it was not possible to distinguish exactly what type and how much proportion of recrystallization process (static, dynamic, or continuous dynamic) has occurred in each region [4]
3.3. Mechanical properties of welded joints
Mechanical properties of welded joints are influenced by hardness distribution, microstructure evolution in transverse section, as well as, the presence of welding defects [4,11-13]. Fig. 9 shows hardness distributions of transverse section of welded samples. A decrease in the hardness distribution at the stir zone was observed for all the shoulder geometries tested. Because the alloy studied here is in strain-hardened condition, the stir zone of welded joints shows a drop reduction in hardness compared to base metal. This phenomenon probably has been caused by the activation of recrystallization mechanisms [19].
For each cross section of the welded joints, differences in the hardness values were observed. Highest hardness values were obtained for lower locations compared with the upper locations, showing heterogeneity of properties [12].
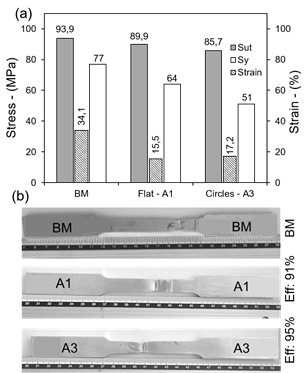
Heterogeneity of hardness distribution was more marked in flat shoulder compared to others shoulders, evidencing lowest values hardness in locations near heat affected zone and highest at center of nugget zone. Tensile test results for welded samples using tools with flat and feature shoulder (circles) compared to base metal are shown in Fig. 10.
All tested welded samples showed a strong ductility reduction. The elongation decreases approximately 52% in all welded joints when compared to base metal. Meanwhile, yield and ultimate strength values of welded samples are slightly lower than raw metal (between 10 to 15%), obtaining an efficiency of welded joint higher than 90%. The above results may be explained from observed microstructure in stir zone for each case of welded sample.
Fracture location for all welded samples was in the advanced side, which is in agreement with the results of tensile test of FSW joints in similar aluminum alloys [12]. Finally, the guided bend test results of the welded samples A1 and A3 showed good results with acceptable ductility and defect-free welds.
3.4. Experimental thermal cycles
Table 3 summarizes information about peak temperatures measured, on both, advancing and retreating sides, at 11 mm from center line of each welded joint developed using each shoulder type. These measurements represent the nearest temperature to shear line, which determines stir zone. An example of experimentally measured thermal cycles in welded joint is shown in Fig. 11, which corresponds to welded joint obtained using spiral shoulder tool. In general, peak temperatures are highest at the advancing side compared to the retreating side.
Additive effects of rotational and tangential velocities on the advancing side could explain this aforementioned behavior. Additionally, it was observed that flat tool shoulder generated the highest peak temperatures compared to feature tools.
In the stir zone, the recrystallization process is determined by two conditions: peak temperature reached during welding [19] and the relationship between process parameters and annealing cycle [20]. Therefore, the larger surface area in feature tool shoulders could concentrate more work at the plasticized region dragging more material, as it was observed on the microstructure characterization. The above-mentioned is consistent with narrow regions with dropping of hardness in welded joints obtained using feature tools, compared to the behavior of the same region obtained with flat tool. Precisely, tools with flat shoulder obtained the highest peak of temperature beyond the stir region, which is consistent with the highest production of frictional heat than plasticizer heat for this tool type. The recrystallization level and substantial reduction of hardness observed in stir region of these welds confirm these results [21].

Source: The authors
Figure 9 Results of scanning hardness distributions of transverse section of welded samples. A1: flat shoulder, A2: spiraled shoulder, and A3: concentric circled shoulder.

Source: The authors
Figure 10 Results of tensile test. (a) Comparison of ultimate strength (Sut), yield strength (Sy), strain (%), and joint efficiency (Eff.) amongst base metal (BM), A1, and A3 welded samples. (b) Appearance of tensile tested samples.
4. Conclusions
In this work the effects of geometry shoulder of tool on microstructure and mechanical properties of commercially aluminum alloy AA1100 welded joints obtained by friction stir welding were studied. Three different types of geometry shoulder of tool were tested, one flat and two features (concentric circles and spirals). The surface area of tested tools was 27% and 11% lower in flat shoulders than feature shoulders, respectively. With the aim to compare under same experimental conditions several testing sets were developed. A revolutionary pitch value (R) constant of 0.1 mm.rev-1 was used to evaluate microstructure evolution, thermal cycles, tension test, and hardness distribution in welded joints. It is concluded that features shoulder tools have induced thermal cycles in the regions out of stir zone less severe than flat shoulders. Differences in distributions of plasticity and frictional work were generated due to geometry of shoulder. It was observed that welded joints obtained with features shoulders generated a wider stir region with higher grain size in stir zone in compare to flat shoulders.


