1. Introduction
The growth of the automotive industry has emphasized the importance of sustainable and lightweight materials that reduce fuel consumption and environmental pollution. To improve efficiency, current vehicle manufacturers have substituted steel with aluminum, and have begun using composite materials and polymers such as hot melt adhesives that are reusable, recoverable, and recyclable. Such adhesives facilitate the joining of various types of materials in a rapid, safe, and economically feasible way, thereby improving manufacturing efficiency. The use of adhesives enables reprocessing during joining, and at the end of the vehicle’s life it facilitates the separation and recovery of materials before crushing [1,2]. Reactive hot melt adhesives confer favorable properties on the union between materials, and are therefore suitable for both structural applications-including in the automotive sector-and non-structural applications. At room temperature, such adhesive systems comprise a non-volatile thermoplastic polymer and a non-aqueous solid vehicle. They are applied to the materials to be adhered in the molten state, and require a curing time to obtain a stable bond. During solidification, hot melt adhesives undergo crosslinking reactions, and chemical connections form between molecules, preventing flow or creep and providing high thermal and chemical resistance. Such adhesives have short curing times, do not require volatile organic compounds, and have long service lives [3]. Hot melt adhesives have many of the desirable processing characteristics: they do not include solvents or require mixing, and their handling resistance is almost immediate. Conventional non-reactive hot melt adhesives (e.g., ethylene-vinyl acetate, polyesters, and polyamides) are widely used in many industrial applications, but they have certain performance limitations, such as low heat resistance, water and solvent permeability, and creep [2,4]. These limitations generally preclude their use in many critical applications and structural assemblies. Several hot melt adhesives have been developed for specific substrates in various environments. Most formulations combine the following four basic components: (1) polymers that provide the mechanical properties necessary for performance-they can be homopolymers or copolymers with several specific functional groups according to each application; (2) resins or tackifiers that control the viscosity of the formulation and increase adhesion to specific surfaces; (3) inexpensive low-molecular-weight waxes that reduce the curing and crystallization speeds; and (4) other additives-such as antioxidants and other functional polymers-that protect the adhesive, and thus increase its service life and stability, or improve its binding to specific substrates [4-6].
The wettability allows predicting the ability of the adhesive to wet the different substrates (adherents) at different temperatures, and it is related to the adhesive affinity. The contact angle is the measurement parameter for adhesive wettability. For a correct adhesion, the adhesive must have a surface tension less than or equal to that of the solid / substrate, which indicates a contact angle of less than 90 ° [5,7].
Composite materials with semi-crystalline polyurethane matrices have been well studied, but matrices comprising polyurethane reactive hot melt adhesives have received much less attention [7, 8]. The rheological properties of adhesive compounds are relevant to the following two fundamental aspects: (a) analysis of the processing performance of the system; and (b) evaluation of the interactions between the reinforcement and the polymer chains. To a large extent, the final properties of crystallizable polymers depend on the degree of crystallization achieved. In the present study, we focused on the use of a hot melt polyurethane (hot melt PUR) as an adhesive, instead of its application as a composite material matrix. The performance of this type of adhesive depends on its rapid crystallization during cooling, which favors quick solidification and welding [7,9]. The technological development of carbon and glass fiber composites has led to the manufacture of more resistant reinforcement materials, facilitating the wider use of lightweight composites with better mechanical properties.
The characteristics of composite materials depend on the properties of their constituents, such as the fiber/matrix interface, the volumetric fraction, and the spatial distribution of the fibers; both the tenacity of the fibers and the interaction between the fibers and the matrix are crucial to the mechanisms involved in breaking stress and energy dissipation [10-12].
2. Experimental procedure
We used 330-mL SikaMelt®-9677 cartridges for the polyurethane-based reactive hot melt adhesive. Because its application properties are a function of temperature, it is necessary to heat and maintain the adhesive at a constant temperature to guarantee its viscous liquid state. We used a Robatech HP-10K/SP gun to achieve a continuous flow and ensure the correct application of the adhesive on the test specimens. Ten different adhering specimens were selected: acrylonitrile/butadiene/styrene (ABS); ABS with subsequent plasma surface treatment (ABS + PST); lacquered aluminum; lacquered aluminum + PST; aluminum (which was sanded for the tensile shear test); anodized aluminum; high-density polyethylene (HDPE); HDPE + PST; carbon fiber; and fiberglass. These materials and surface treatments were chosen because of their extended use and their importance in the industry. We used Vetrotex type E fiberglass. The carbon fiber was 0.6 mm-thick high breaking strength (HR) fiber with a filament density of 12K, and was supplied by Mel Composites.
The PST was a plasma discharge treatment known as corona treatment, which is performed at low temperatures with compressed air in the absence of oil and water. This treatment modifies the surface by increasing the tension and surface energy. It is carried out in two passes at a fixed application speed of 6 m/min, and the distance between the flame and the surface is 6 mm. We used a Plasmatreat system to carry out the plasma treatment; the system comprised two components: a plasma generator (model FG3001) and a plasma rotating nozzle (model RD1004).
The wettability of the adhesive with regard to the substrates (ABS, aluminum, polyethylene, fiberglass, and carbon fiber) was determined using a goniometer, which measures the contact angle. The contact angle depends on the intermolecular forces of adhesion and cohesion between the different phases. The wettability of the adhesive or matrix in fiberglass- or carbon fiber-reinforced materials is very important because it is closely related to the bonding strength of the matrix reinforcement. The contact angle is used to evaluate the wettability of the adhesive in the reinforcement, to determine if the adhesion improves or worsens depending on the surface of the material and the temperature at which it is applied. We carried out wettability tests in accordance with the American Society for Testing and Materials (ASTM) standard D 7490. These tests allowed us to assess the ability of the adhesive to wet the various substrates at different temperatures. We used an OCA 15 plus goniometer managed with SCA 20 software (both provided by Neurtek Instruments) to measure the contact angles. The contact angle is the average of the angles formed at either side of a droplet. We carried out thermogravimetric differential scanning calorimetry (DSC) and thermogravimetry (TGA) analyses on an SDT Q600 thermobalance, which allows the simultaneous measurement of DSC and TGA. The thermograms were obtained between 21 °C and 250 °C at a heating rate of 5 °C/min in both air and nitrogen atmospheres. Approximately 7-8 mg of each adhesive sample was placed inside an alumina crucible for DSC-TGA thermal analysis. The DSC thermograms were obtained whilst purging with nitrogen at a flow rate of 50 mL/min.
For the tensile shear tests, the substrate specimens (100 mm × 25 mm × 1.6 mm) were manufactured in accordance with the UNE-EN 1465: 2009 standard; and an overlapping length of 12.5 mm was left. This standard specifies the procedure for determining the shear strength of an adhesive bond by subjecting a tensile force to standardized specimens, where the substrates stick together in an overlapping manner under specific conditions of preparation and testing. This procedure ensures that the tensile force is kept parallel to the area of adhesion and the axis of the specimen. The machine has a pair of jaws that move in line with the specimen as soon as the load is applied, so that the specimen can be held in such a way that its longitudinal axis always coincides with the direction of the tensile force. We used a model EM/200/FR traction machine with SCM3000 control and measurement software (both from Microtest). The surfaces of the substrates were sanded with # 120 emery paper (apart from the fiberglass and carbon fiber), and cleaned with acetone to remove grease and dirt, because such contaminants may affect adhesion.
Shore A hardness tests were performed with a truncated cone indenter of 35º angle and truncated cone Shore D hardness of 30º angle; both to the composite material and to the adhesive or matrix, under the ASTM D2240 standard. Five measurements of hardness are made at different points of the test piece located at a distance of at least 6 mm from each other. The durometer used to measure the Shore hardness of the specimens was model 676 from the manufacturer J.Bot S.A.
To manufacture the composite material test specimens, we melted the adhesive at 130 °C to 140 °C in a muffle furnace with a sensitivity of +/- 3 °C and dimensions of 40 cm × 30 cm × 30 cm. Once the adhesive had melted, we emptied it into a Teflon mold at 130 °C, ensuring that the adhesive or matrix was evenly distributed throughout the mold. We then introduced the reinforcement (fiberglass or carbon fiber) into the mold and continued to supply the adhesive, once more ensuring that it was evenly distributed. Finally, we closed the mold and applied pressure to reduce the porosity and improve the uniformity of the composite material. We cut specimens (250 mm × 25 mm × 2.5 mm) from the prepared composite material according to the measurements specified for a stress test in ASTM standard D 3039; six specimens were made for each material. The tensile and bending tests were carried out in an INSTRON 4505 machine with a loading capacity of 100 kN.
3. Results and analysis
3.1. Adhesive characterization
We carried out thermogravimetric tests (DSC and TGA) to investigate the behavior of the adhesive as a function of temperature. The TGA technique records the mass of a sample placed in a controlled atmosphere as a function of temperature or time. DSC is a dynamic technique that quantifies the heat absorbed or released by a substance, either at a constant temperature for a certain time, or when heated or cooled at a constant rate in a certain time interval. Materials release or absorb heat when their physical state changes-such as during melting, glass transition, or transition from one crystalline state to another-or each time they react chemically (e.g., by degradation, oxidation, or dehydration).
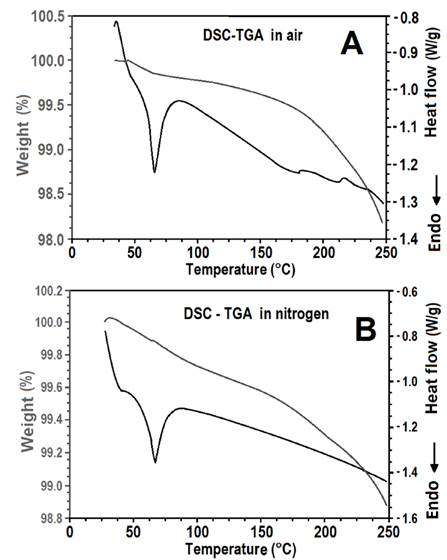
Fig. 1 shows the results of the DSC and TGA analyses of the reactive polyurethane-based hot melt adhesive in both air and nitrogen atmospheres. There was a slight difference in the behavior of the adhesive in the two different atmospheres because the humidity of the environment can affect the crosslinking reactions in the adhesive. It is obvious from both graphs that glass transition and the adhesive reaction started at approximately 50 °C. The melting process of some adhesive compounds after approximately 60 °C, at which another phenomena take place such as forces Van der Waals, bonding hydrogen, bonding ionic and charge transfer. Fig. 1a features two endothermic peaks at 180 °C and 232 °C that are absent from Fig. 1b and are attributable to the weight loss of the sample.
Source: The Authors.
Figure 1. DSC and TGA analysis for the adhesive in air (A) and nitrogen (B) atmospheres.
At 60 °C, the adhesive was in a gummy, rather than a liquid, state; it ceased to behave in a rigid manner and started to deform easily owing to the greater freedom of internal rotation of its chains. The weight loss of the adhesive differed according to the atmosphere in which the tests were conducted. In air, there was a more noticeable change in the weight loss slope above 180 °C owing to volatilization and reactions. In contrast, in the nitrogen atmosphere the change in the weight loss slope occurred at 170 °C. However, another change in the weight loss slope at 232 °C occurred in both atmospheres.
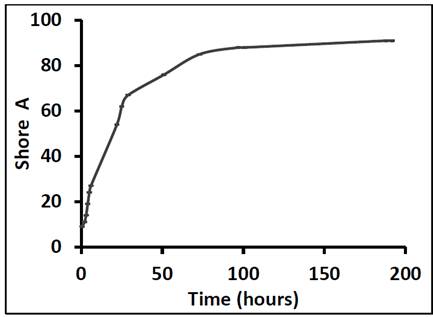
Fig. 2 shows the variation in the Shore A hardness of the adhesive as a function of curing time over 336 hours. As expected, the hardness of the adhesive increased over time, the greatest increase occurring in the first 24 hours (600 %). These results are in close agreement with the data provided by the manufacturer Sika, who claim that the most significant increase in hardness occurs during the first 22 hours. However, in the present study the rate at which the hardness increased began to decline after curing for 30 hours; the hardness increased by 40 % from 30 to 73 hours. We observed another significant deceleration after 73 hours (and from that point to 192 hours, the hardness increased by approximately 7 %). The hardness of the adhesive stabilized after it had been cured for 192 hours. Given that the hardness peak was reached after 192 hours, manufactures should recommend curing times of longer than 22 hours, and should warn against subjecting the adhesive to mechanical demands before 100 hours. The curing time is a determining factor for hardness, which is related to other mechanical properties.
3.2. Characterization of adhesive joints
According to the manufacturer’s technical sheet, the temperature range for application of the hot melt adhesive is between 110 °C and 150 °C. However, we carried out the contact angle tests within the range 110 °C to 170 °C. The surfaces of the six different substrates were at room temperature during these tests. Above 150 °C, the results verified both a decrease in the adhesive viscosity and the onset of undesirable crosslinking. The adhesive was applied to 10 points of each flat surface, and the drops were 2-6 μL in volume to reduce the negative effect of gravity on the contact angle.
Fig. 3 shows the contact angles of the adhesive on the six substrates at 140 °C. Table 1 includes more data corresponding to the entire temperature range (110 °C-170 °C), and reveals that the contact angle decreased as the temperature increased. The most accelerated reductions correspond to temperatures between 110 °C and 140 °C, which agrees with the product data sheet. Finally, all the contact angles in Table 1 are less than 90 °, which guarantees the minimal wettability of the substrates for application of the adhesive. This result confirms the temperature range for application claimed in the technical data sheet. To assess the effect of thermal treatment by plasma on the wettability of the adhesive, we measured the contact angles of the adhesive deposited on the surfaces at room temperature. We found that plasma treatment only had an effect on the wettability of polyethylene, and had no effect on aluminum, lacquered aluminum, or ABS.
The simple tests on lapped pieces of the various materials revealed the evolution of the mechanical properties of the adhesive in relation to the curing time. The properties under consideration were: maximum shear stress, linear deformation, angular deformation, modulus of elasticity, and stored energy. The tests were carried out at 24, 192, and 336 hours after applying the adhesive.
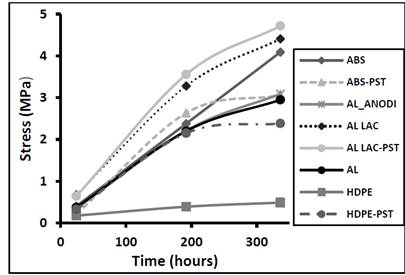
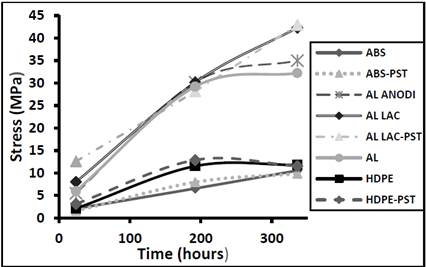
Fig. 4 shows the maximum shear stress as a function of the curing time for the various substrate materials, proving that the shear stress increased with curing time. The adhesive bond strength increased as crosslinking progressed, and became more resistant with the passage of time, but there was very little improvement to the mechanical strength after 336 hours. The lacquered aluminum substrate formed the most shear-resistant adhesive bond. As expected, plasma treatment resulted in a slight increase in the shear strength. The polyethylene substrate formed the least shear-resistant adhesive bond, but plasma treatment resulted in a considerable improvement to the bond strength. This implies that the polyurethane-based reactive hot melt adhesive investigated in the present study is not the best candidate for forming resistant joints with polyethylene, although plasma treatment prior to joining does appear to reverse the situation. In the case of ABS, plasma treatment improved the shear resistance up to 192 hours, but then the rate of improvement declined up to 336 hours.
Source: The Authors.
Figure 4. Maximum shear stress as a function of the curing time for different adhesive materials.
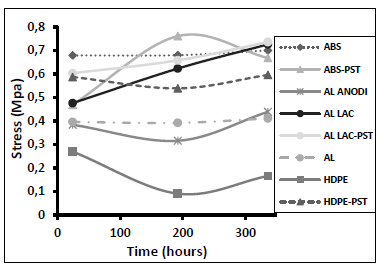
Fig. 5 shows the results of the angular deformation tests performed after joining the various substrates and curing for 24 hours. We carried out two additional sets of tests after 192 and 336 hours. In general, longer curing did not significantly alter the angular deformation of the adhesive bond. However, there were some exceptions: the surface treatment of polyethylene resulted in the greatest overall improvement. Lacquered aluminum (both treated and untreated) exhibited the highest evolution and angular deformation (followed closely by ABS). ABS was the only material that did not exhibit an improvement in resistance to angular deformation after surface treatment during the first test. However, in the second test (after 192 hours) the resistance to angular deformation of the treated ABS increased compared with the other materials.
Source: The Authors.
Figure 5. Angular deformation as a function of the curing time for different adherent materials.
Fig. 6 shows increases in the modulus of elasticity for all the materials in the first 192 hours of curing time. The only material that did not exhibit a slowing down in the rate of increase of its modulus of elasticity was lacquered aluminum. The rate of increase in the modulus of elasticity differed according to the material, giving rise to the following observations. The lacquered aluminum had the highest modulus of elasticity, regardless of whether it had been treated by plasma discharge. The anodized aluminum and the lacquered aluminum had very similar values. ABS and polyethylene had the lowest moduli of elasticity, irrespective of plasma discharge treatment. The low moduli of elasticity of the ABS substrates are in strong agreement with the high level of resistance to angular deformation reported for this material in Fig. 5. Aluminum and anodized aluminum behaved in a similar way: their moduli of elasticity increased steadily over the first 192 hours, but the rate of increase declined thereafter.
Source: The Authors.
Figure 6. Modulus of elasticity as a function of curing time for different adhesive materials.
The fiberglass and carbon fiber wettability results with respect to the adhesive could lead to the manufacture of composite materials. Fig. 7 shows the results of tensile tests on such composites. The fiberglass composite had superior mechanical behavior compared with the carbon fiber composite because the latter was more porous. This high porosity can be corrected by improving some of the manufacturing parameters. For example, adjusting the temperature at which the adhesive is applied; reducing the adhesive heating time; applying the adhesive in the shortest possible time after opening it; and activating the carbon fibers to make them more porous, thereby enabling the adhesive to bind better to the fibers. Raju and Balakrishnan fabricated a composite comprising E-fiberglass as the reinforcement material, epoxy resin as the matrix, and HY951 as the matrix hardener.
The resulting composite had a maximum tensile stress of 96 MPa with 15 % fiberglass [13]. Roque-Maciel et al. fabricated a composite comprising E-fiberglass as the reinforcement material and epoxy resin as the matrix; the resulting composite had a maximum tensile stress of 71.91 MPa with 30 % fiberglass [14].
Both composites exhibited linear behavior and AGM (2) type failure mode, according to ASTM D3039. Fiberglass has a higher percentage of deformation. These materials are fragile (exhibit fracture behavior) with high elastic deformation. This is because once the fiber is broken; the matrix is no longer able to withstand the tensile stress of the test, resulting in a fragile fracture. Therefore, the fracture occurs both in the matrix and in the reinforcement. Deformations obtained during the tensile test are as high as 8 %. The elastic moduli of these composite materials are low because they deform before failure.
4. Conclusions
The results of the present study revealed that the curing process affects the mechanical properties of the adhesive; a resistant bond is formed within the first 30 hours, and maximal resistance is reached after 192 hours of curing. This enables any error in the application of the adhesive to be corrected during the first hours by reheating the adhesive bond, thereby preventing the loss of previous work.
The wettability tests showed that the temperature has a direct influence on the wettability of the adhesive bond. Furthermore, there is clear evidence that surface treatment by plasma discharge (prior to adhesive application) does not significantly alter the wettability of the substrate.
The versatility of hot melt PUR facilitates the joining of various substrates. The quality of the joint depends on the surface tension of the adhesive. Bonds formed with lacquered aluminum and ABS had the most favorable mechanical properties and cohesive breaks owing to the low surface tension of the adhesive, whereas bonds formed with polyethylene had inferior mechanical properties and adhesive breaks owing to the high surface tension of the adhesive. However, after surface treatment with plasma discharge, the mechanical properties of the bonds formed with polyethylene matched those of the bonds formed with both untreated and anodized aluminum. Moreover, the bonds formed with polyethylene had greater flexibility and elasticity.
The adhesive investigated in the present study is a good candidate for the manufacture of fiberglass composite materials because it has low density, high tensile strength, and a large working temperature range (-40-110 °C). Carbon fiber did not reach the expected tensile strength owing to a possible error in the manufacturing process that we hope to correct in future works.


